Trek-A-Sat- MS
Topic outline
-
 Written By: Frances Dellutri, Middle School/Intermediate Level EIS Education Team, June 2016
 EIS Topic: Atmosphere, Centripetal Force, Computers, Mathematics, Micro-gravity, Free-fall, Orbital Mechanics, Physics, Satellites, Spacecraft, Weightlessness
Grade (Age) Level: Grades 5-8 (Ages 10-13)
Key Topics Associated with Standards: Collecting, Analyzing and Interpreting Data; Gravitational Interactions; Forces and Motion, Relationship between Energy and Forces
A satellite is moving overhead every few minutes and it's fun to be able to identify them, watch for them, and track them. This project gives great direction on how to track satellites overhead, both visually and electronically.
Trek-A-Sat gives you the tools to track a satellite in the sky right now in real time!
If you would like to learn more about satellites, their orbits and the forces involved with orbiting satellites, log into The EIS Academy and learn about satellites in the lesson called "Satellites - Understanding How They Work! "
https://www.eisacademy.org/course/view.php?id=54
If you are ready to start tracking satellites, move ahead to join the lesson where you wish!
INDEX
Section 1. Trek-a-Sat
Section 2. Understanding Where Satellites are Found
Section 3. Looking at Factors That Affect the Orbit Time and Position of Satellites.
Section 4. How did You Use this Lesson -
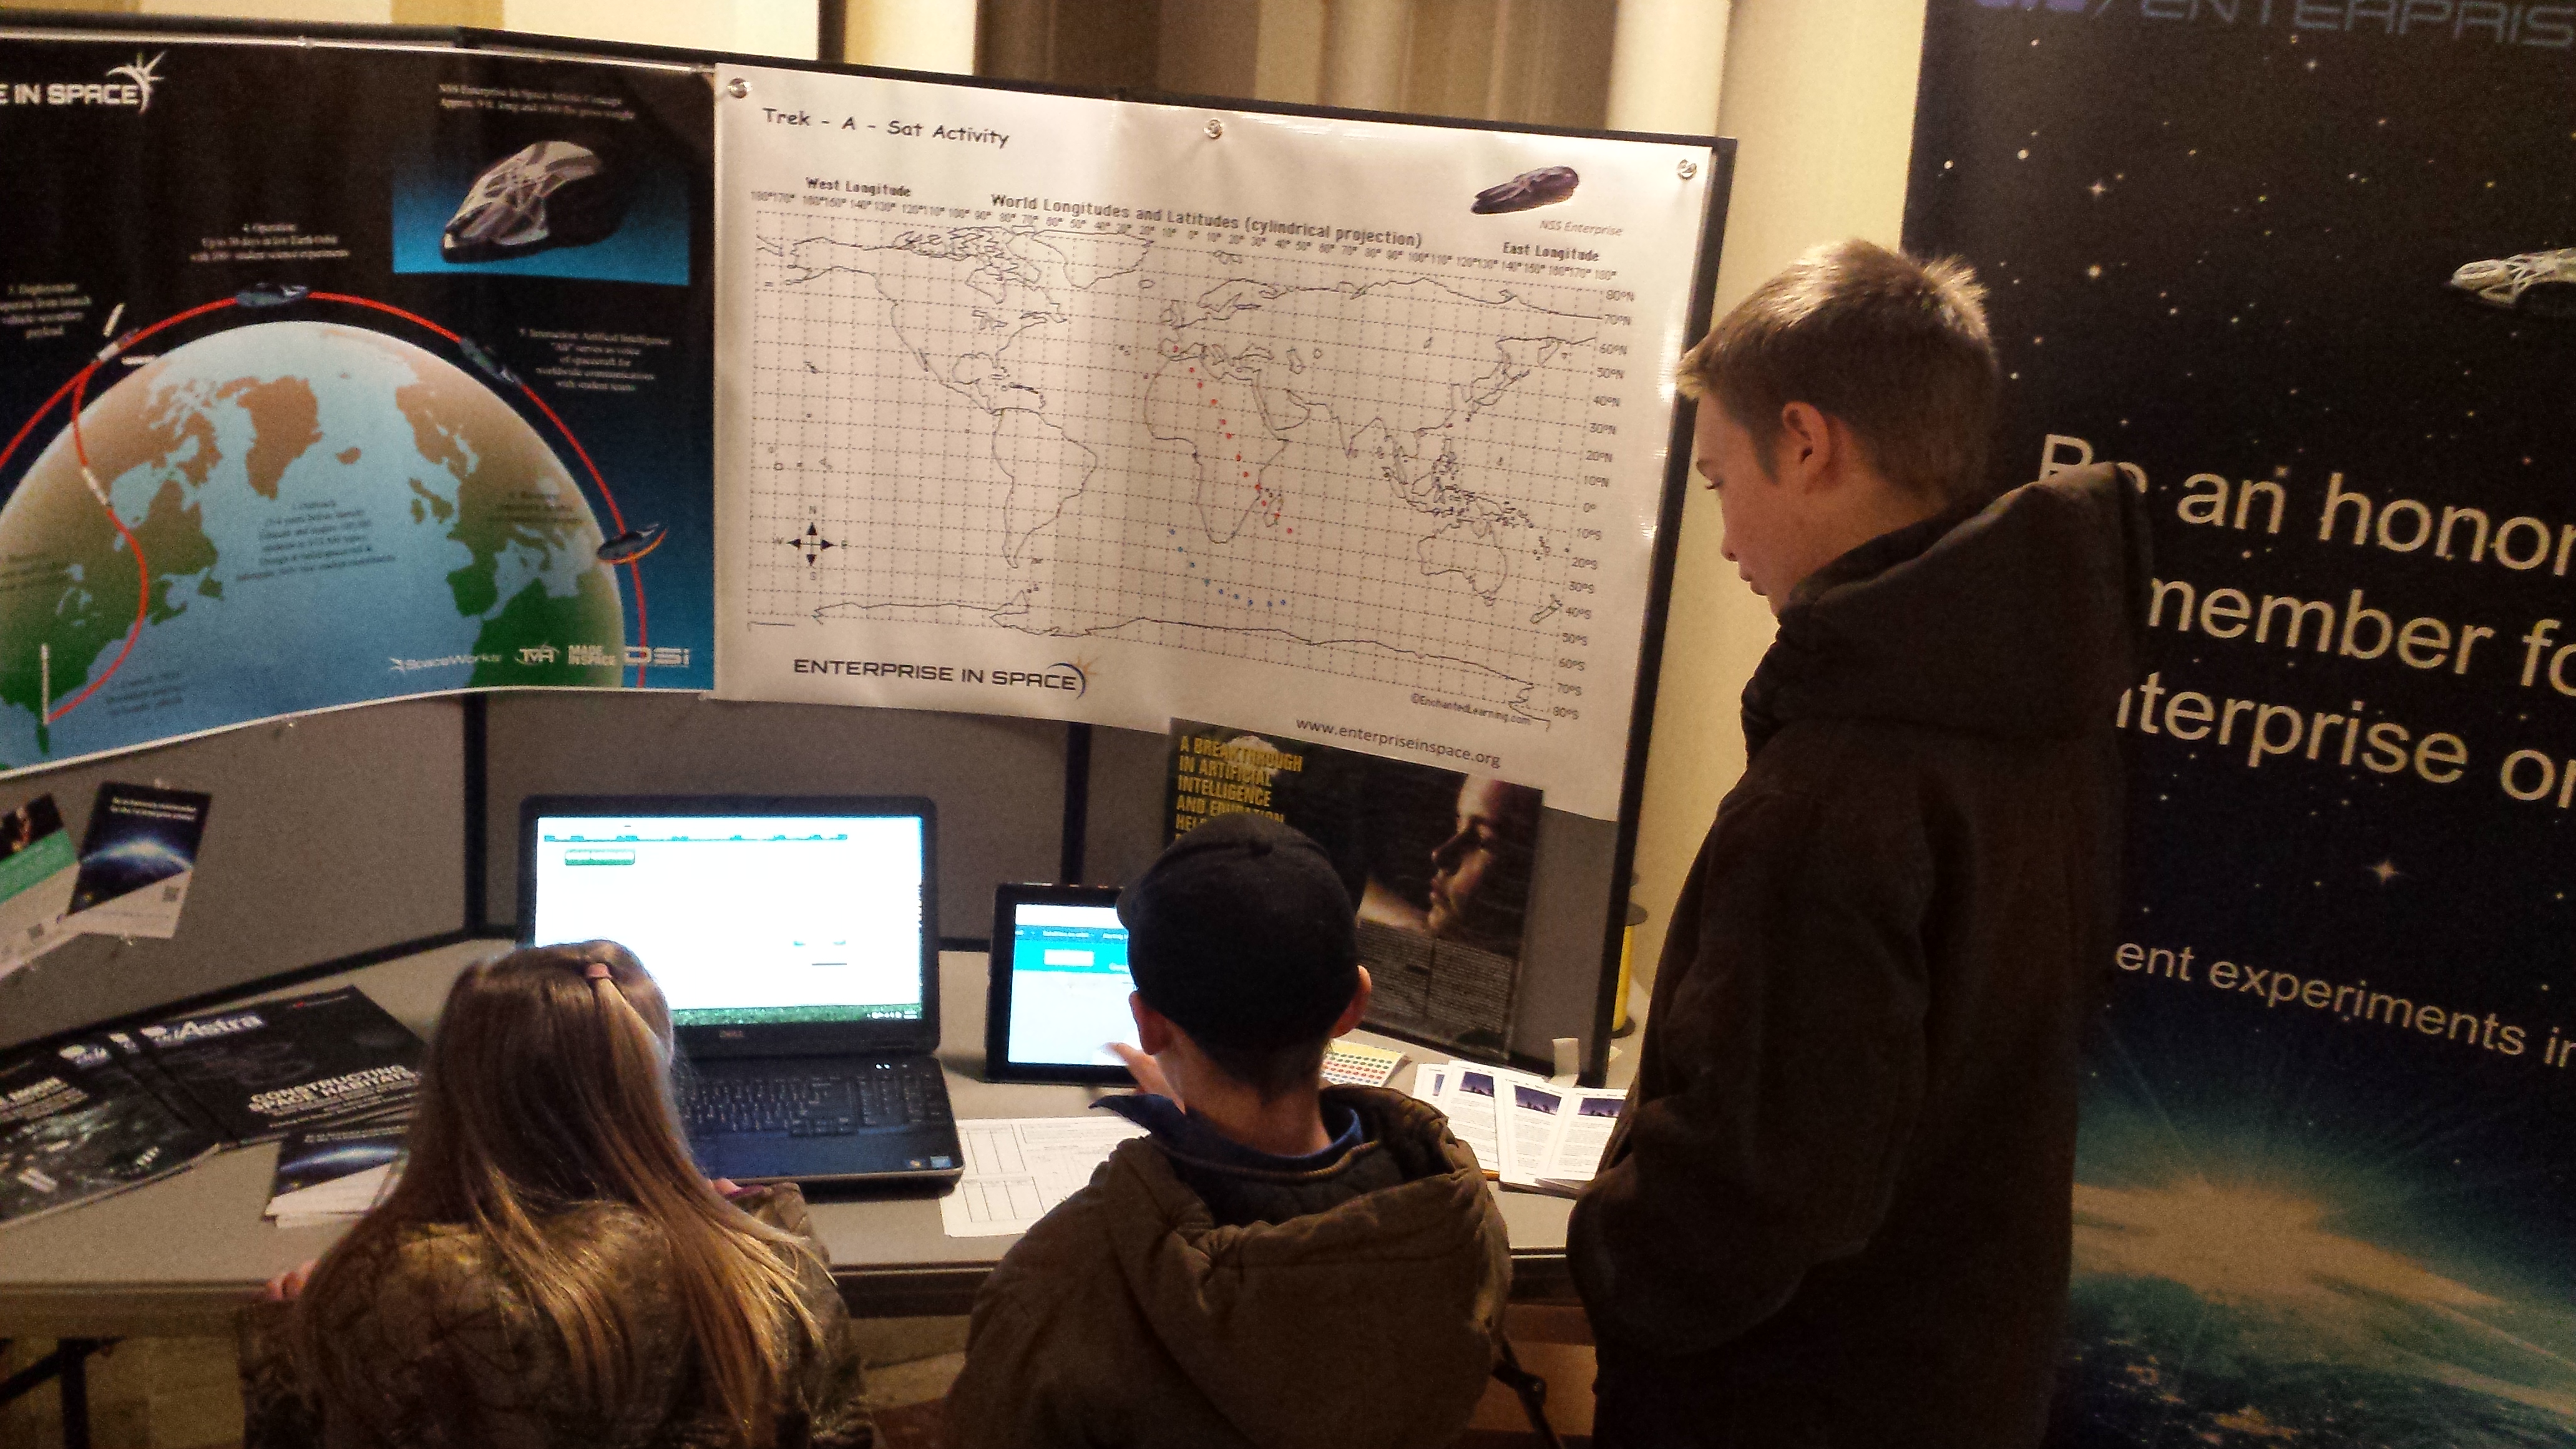
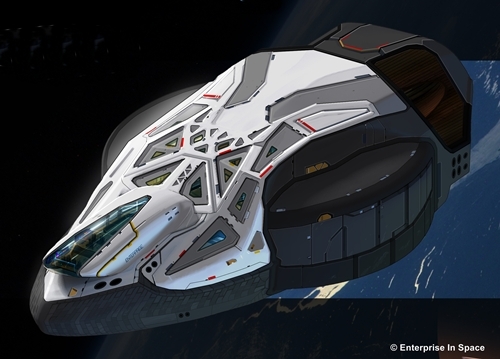
 Here is a great activity that gives you the tools to track a satellite right now, in real time. Enterprise In Space has its mission to launch, orbit and recover the NSS Enterprise, a satellite carrying 100+ experiments designed by students K - University and you will be able to track its journey upon launch in 2020-2021. Follow the steps below to track the satellite in which you have an interest. If you would like to find out more about predicting where satellites will be and how to view them in the night sky, take a look at the other projects under this lesson. There are tracking logs and maps in the resources at the bottom of this lesson.
 Another lesson explores how satellites orbit and the forces involved with their orbit. It is found at:
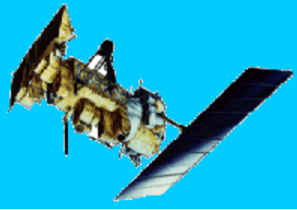
European Space Agency Image
Best of luck tracking!
Trek - A - Sat Log Instructions Satellite:______________________
Date of Tracking:_______________________ Tracker: ________________________________
Supplies needed: pencil, colored pencils. Log and map printed out for this activity.
1. Go to website: N2YO.com http://www.n2yo.com/?s=27422
Register on the website If you wish for the website to note your tracking location and access to other options. It is not necessary to register to complete this activity.
2. Select the satellite you would like to track from the ribbon located at the top of the webpage. If you have a partner, have them track another satellite during the same time period on a separate log.
3. Determine the period of time you wish to record the selected satellite. . Decide how often you will be doing this (every minute, every two minutes).
4. Record the time, latitude, and longitude degrees (without minutes) in the Satellite Tracking Log.
5. Using your recordings, plot the satellite's progress on the map using the latitude and longitude recordings.
6. Use different colors for multiple satellites. Connect your markings with a solid line.
7. With a dashed line, extrapolate where you think the satellite's path will continue.
Files: 2Progress: 0 / 0 -
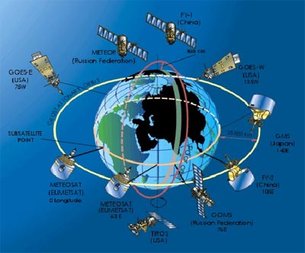
2. Understanding Where Satellites Can Be Found.
HighlightedHave you gazed up into the sky and wondered about a moving point of light?

You should not have to wait more than 15 minutes to spot one of the more than 35,000 satellites now in orbit around Earth. It will appear as a steadily moving star across the sky but only lasts for a few seconds or minutes.
If you see blinking lights , you probably are seeing a plane, not a satellite. The satellites you can see are large enough (typically more than 20 feet or 6 meters in length) and low enough (100 to 400 miles above Earth or 160-644 km)) to be most readily seen as sunlight reflects off them and beams right onto your location.
http://veryshareimg.com/looking-up-at-stars.html
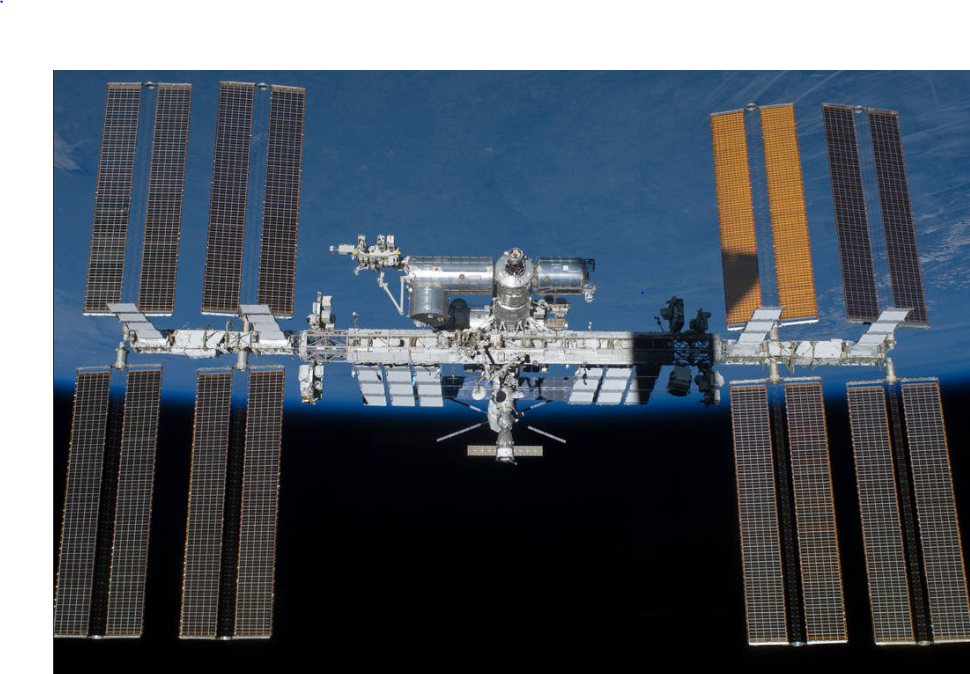
NASA operates a website called 'Spot the Station' which provides opportunities to spot the International
Space Station by giving a text listing of the location by city. You can also sign up to hear about the opportunities via email or on your cell phone. This great website is:
https://spotthestation.nasa.gov/sightings/
The NSS Enterprise orbiter will be launching in 2020-2021 with student experiments on board and will become one
 of the
visually and electronically track-able satellites. This Trek-A-Sat Activity will prepare you for tracking the NSS Enterprise !
of the
visually and electronically track-able satellites. This Trek-A-Sat Activity will prepare you for tracking the NSS Enterprise !Let's take a look at the behavior of a satellite as seen from the ground.
Satellites can often be seen from the ground with the naked eye and many satellites can be tracked as they orbit Earth. This activity will show you how to track satellites.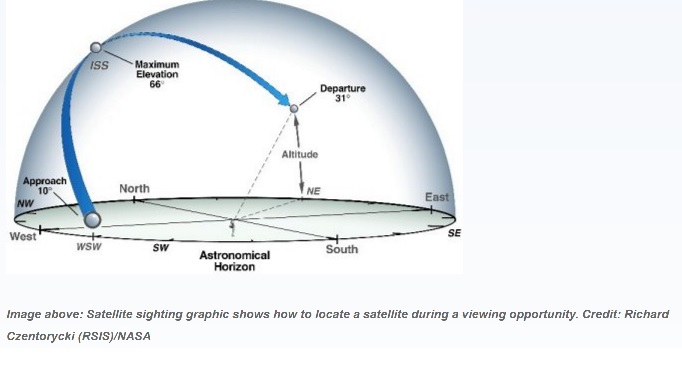 In this diagram, you can see the ISS (International Space Station) move from west to east and at it's zenith (top most elevation) is at 66 degrees from the horizon.
 You can determine the degrees in elevation (up from the horizon) or the azimuth (degrees from a direction such as due North) by extending your arm at shoulder level and making a fist. From the pinky finger to the closed thumb over your fist is 10 degrees. Each finger represents 2 degrees.
 This is a very fun measurement and is reliable.
daphne.polarmar.edu
Try the Measurement for yourself:
Find a place outside where you can see the horizon (a place where the sky meets the ground)
Let's try an altitude measurement. (Altitude is the measurement in degrees from the horizon up into the sky.)
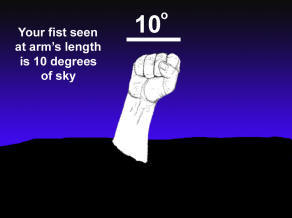
1.. Extend your arm directly in front of your body at shoulder height. Make a fist (vertically) with the thumb on the outside of your first. (Let's say your right arm and fist.) This will be Arm #1. As you look down your arm this fist represents 10 degrees. The bottom of the fist should be even with the horizon. Freeze that arm in the air.
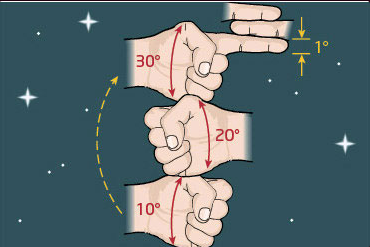
2. Now make a similar fist with your other arm and hand. Place the second fist (let's say the left arm and fist) and set it on top of the frozen arm being careful to keep your arm fully extended. Don't let Arm #1 slip down toward the ground! You now have 20o . Now freeze Arm #2 and place the extended Arm #1 and fist on top of Arm #2 fist and freeze it again. (You have now marked 30 degrees from the horizon.)
3. Repeat this procedure, counting the number of times you add a fist until you have reached directly over your head. You should need 9 fists to do this. 9 x 10o means that directly overhead is 90o from the horizon - a right angle!
4. If you required more than 9 fists, then you are 'slipping' when you overlap them or your arms are not fully extended or your thumb is not on top of your fist. or perhaps you are not bringing the fists so that they touch before you bring another fist around. If you required less than 9 fists to move from the horizon to directly overhead you then you may be moving your hand up as you bring the other fist around or possibly. Have someone watch what you are doing for feedback. If you were successful, move ahead!
Let's try an azimuth measurement. (Azimuth is the degrees around the horizon,)
1. Set up the four directions North, South, East, and West and mark them. You can also use a compass to determine where the directions are. This exercise works best if you label the directions 20 (about 6 meters) from the person trying to take the azimuth.
2. You can start this activity where due North is and work from there or start at another directional point (East, South, or West.)
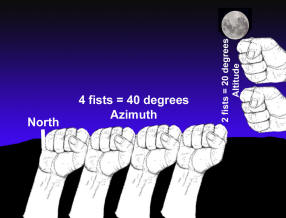
3. Extend Arm #1 again at the horizon and make a fist, but turn your fist so that it is parallel with the ground (horizontal rather than vertical as with the altitude measurement). Take a look at the diagrams in blue above.
4. Extend your arm again at shoulder height and place your fist so that the smallest finger is even with the direction (N,S,E,W). Freeze that arm and fist and then extend the arm and fist and place it next to the first fist, keeping the arms at shoulder height and fully extended. Continue one fist next to the one before until you get to the next direction's mark. Again, you should have required 9 fists to move from one direction to another (example: due North to due East) because there is 90o between the directions. ( A circle has 360o and there are 4 directions, 360 ÷ 4 = 90).
5. If you are having trouble getting the nine fists in the 90 degree segment, take a look at the tips in the altitude measurement section.
Applying Altitude and Azimuth Measurements
Now that you know how to pin point a position in the sky using altitude and azimuth, when you get notification that a satellite will be in your area, you can then anticipate where in the sky it will be! Enjoy your visual tracking!
 https://teachtheyoungerwomen.files.wordpress.com/2013/02/school20assemblies-nightsky.gif
 -
Predicting the Path of a Satellite Activity
(This activity is optional, but the mathematics are very helpful in this activity.)
Resource - Adapted from: http://octopus.gma.org/surfing/satellites/orbit.html (NASA Learning from Satellites)
Supplies Needed for this activity:
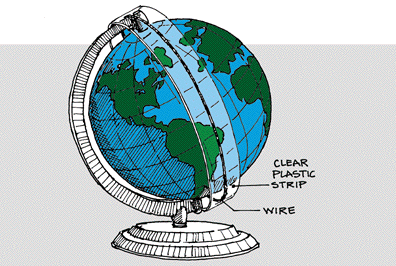
- 12-inch or 30.48 cm globe (this is the globe diameter)
- length of #10 wire (20 in to 40 in or 51 cm to 102 cm) to project orbital plane
- clear plastic strip to project width of Earth image
- data for a NOAA-class satellite (suggestion: use N2YO.com)
- ruler
- protractor
- compass
Satellite orbits lie in planes that bisect the orbited body. If the Earth were not rotating, each orbiting satellite would

pass over the same point on the Earth with each orbit, crossing the equator repeatedly at the same longitude.
Because the Earth is constantly rotating, each orbital pass of the satellite (as indicated by the model described in this activity) appears to be to the west of the previous one. In reality, the Earth is rotating eastward as the orbital plane remains fixed.
You can examine the factors determining the length of a satellite's orbit around Earth
Determining location in subsequent orbital passes:
Recognize that the Earth rotates 360 degrees in 24 hours, or:60 minutes X 24 hours = 1440 minutes
1 hour 1 day 1 day
Dividing 360 degrees by 1440 minutes shows that the Earth is rotating 0.25 degrees every minute. Here's the math:
360 degrees = 0. 25 degrees
1440 minutes 1 minute
In this example, the satellite that we track travel around the Earth has an orbit period of 102 minutes. Thus, we can see that if the satellite crossed the equator at 0 degrees longitude on one orbit, it would move over on the globe by 25.5 degrees longitude 102 minutes later.
0. 25 degrees = 25.5 degrees
1 minute 102 minutes
The extremely large size of the Earth in relation to the small thickness of the atmosphere leads to frequent, intentional distortions of scale in map projections. A worthwhile activity is to construct a true scale physical model of an orbiting satellite's path around a classroom earth globe to understand the physical characteristics of a satellite's orbit.
Given the following information answer the questions that follow.
If you are tracking the NOAA series of weather satellites, the following figures will be a close approximation.
Km. Miles
Mean orbital altitude 860 534
Width of field of view 2900 1800
Orbital period.. 102 minutes
Determine the scale of your globe by measuring either its diameter or circumference and comparing that to the Earth's actual diameter or circumference. (Earth diameter: 12,756 km or 7,926 miles and circumference: 40,030 km or 24,874 miles)
What follows is a series of questions to test for understanding.
Questions:
- What is the Earth's diameter? What is the diameter of the globe?
The sample calculations given here are based on the use of a 12-inch (30.48 cm) diameter globe and should be proportionally adjusted for use of other materials. The diameter of a globe can be determined by first finding the circumference using a tape measure.
A ratio is set up to determine the scale model of the globe:
Globe Size = 1 cm or 1 in
Earth Size x km x mi
Model Earth
Diameter 7,926 miles or 12,756 km 12 inches or 30.48 cm
Circumference 24,874 miles or 40,030 km 37.75 inches or 95.76 cm
Path width 1,800 miles or 2,897 km 2.5 inches or 6.93 cm
Orbit altitude 534 miles or 860 km 0 .80 inches or 2.05 cm
2.What is the ratio of the model diameter compared to the Earth's diameter? This is your scale measure.
Using the circumference of the globe compared to the circumference of the Earth, a ratio can be established as follows:
C=2 π r π=3.14 (to determine the globe's circumference) C= circumference π = pi r= radius of the globe
C of Globe = 37.68 inches = 1 inch or 95.7 cm = 1 cm
C of Earth 24,874 miles 660 miles 40,234 km 418 km
3. Just how high should you position a piece of wire above the classroom globe to represent the satellite path?
(See Answer KEY below #3 to see the calculations for determining the distance a wire would be from your globe.)
Using a piece of wire (#10 - #12 works well), position the wire in such a way as to center the wire over your location on the globe. Let's assume the NOAA satellite is in a polar orbit (many NOAA satellites are in a geostationary orbit).
See the link below for information on types of orbits:
http://6. Understanding satellite orbits.The polar orbit would take the satellite in a north-south path and it would travel close to both poles. If a Chicago, IL location is chosen, the wire should cross the equator at approximately 90 degrees west longitude, and continue up to the left of the north pole by about a few degrees. Experiment with different ways of supporting the wire slightly above the globe. You may be able to use the support bar already found on your globe for support of the wire. The globe should be able to rotate under the wire. You may want to add a piece of plastic transparency material to the wire. A stiff sheet of overhead transparency is a good material to use. This transparency will represent the width of the Earth that the NOAA satellite will image on a typical pass. Because this satellite width is approximately 1,800 miles or 2,099 km.
(The scale plastic strip will be approximately 2.5 in or 6.93 cm wide. See calculations below.)
By the scale established above, the orbital height of 534 miles or 860 km is represented by a scale distance of:
1 inch = 0.80 inch or 1 cm = 2.05 cm
660 miles 534 miles 418 km 860 km
Thus, on this model of the Earth, using a 12-inch diameter globe, the wire representing the orbital plane should be placed approximately 3/4" above the surface of the globe. (Or 30.48-cm globe, the wire will be 2.05 cm above the globe surface.)
- How many miles from your location are the points on Earth over which the satellite will come into or leave receiving range?
This circle will represent the surface of the Earth. Write the scale of measure in the lower right-hand corner as a legend. Draw a circle having the same center as the first, but with a radius of 534 miles or 860 km more than your first circle. This will represent the orbit of the satellite over the Earth's surface. Label point H on the inner circle (Earth's surface) as your town or city. Draw a straight line through this point. That will represent the horizon as it appears from your location.
The satellite we wish to examine can only be received while in an unobstructed straight line from the antenna; thus, it can only be received while above the horizon. The point at which we first receive a satellite's signal is known as Acquisition of Signal (AOS), and the point at which we lose the signal is referred to as Loss of Signal (LOS). A good analogy would be to think of sunrise as AOS and sunset as LOS.
On your drawing, label two points that lie directly under the points at which the satellite will come into (Acquisition of Signal, AOS) and go out of (Loss of Signal, LOS) receiving range.
You may wish to draw a circle on your globe to represent this range, known as the acquisition circle.
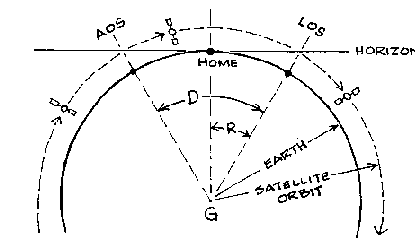
Assume the satellite pass is directly overhead of point H (your home location). R equals the radius of our reception area (acquisition circle) and D equals the diameter of the reception area.
Having established the AOS and LOS points on the orbital curve, project lines from both the AOS and LOS points down to the center of the Earth. Label this point G (Earth's Geocenter). With these lines in place, go back and label the two points where these two lines intersect the Earth's surface. Appropriately label these Points A and L. If we measure the angle formed by points AGL, we find it to be 55 degrees. This is angle D (diameter of acquisition circle). Angle R is half of angle D (R = radius of acquisition circle). Why is it important to know this angle? We are interested in knowing the size of our acquisition circle, that is, the distance from our home location (point H) that we can expect to receive the satellite signal.
We've previously determined that the circumference of the Earth is approximately 24,874 miles or 40,030 km. Set up a ratio to determine "D" distance which is the miles between A (AOS) and B (LOS), given that angle is 55 degrees:
360 degrees    =    55 degrees      or       360 degrees =    55 degrees
24,874 mi       3,800 mi           40,030 km       6,116 km
To determine the distance that the signal will be seen and the location, take a look at the angle HGA or HGL in the diagram above.
This is known as "R" in the diagram and represents how far on each side of the horizon the signal will be received. This amount will be 1/2 the
"D" distance. So the the 'Acquisition Distance' will be 1,900 miles or 3,058 km. We then look on a map north and south of Chicago and see that
signal will be seen north of the Hudson Bay in Hudson Straig and all the way south to Nicaragua in Central America.
- Knowing the period of a complete orbit, find a way to calculate the amount of time that the satellite will be in range if it passes directly overhead as you've illustrated.
Rotate the globe to position the wire so that the northbound orbit will cross the equator at 0 degrees longitude. If the Earth were not rotating, the satellite would always follow the path illustrated by the wire. Would this path ever bring the satellite over your school?
Polar orbiting weather satellites have an orbital period of about 102 minutes. This means they complete a trip around the world in approximately 1 hour and 42 minutes.
The Earth rotates 360 degrees in 24 hours.
- How many degrees does the Earth rotate in 1 minute?
The Earth rotates 360 degrees in 1440 minutes. Thus:
360 / 1440 = 0.25 degrees/minute
7.How many degrees does the Earth rotate in 1 hour?
If the Earth rotates 0.25 degrees each minute, then:
0 .25 x 60 = 15 degrees/ hour
8.How many degrees does the Earth rotate in 102 minutes?
If the Earth rotates 0.25 degrees each minute, then:
0.25 x 10² min = 25.5 degrees/orbit
9. If the satellite crossed the equator at 0 degrees longitude at 0000 UTC, at what longitude would it cross the equator 102 minutes later?
The satellite crosses the equator at 0 degrees west longitude. The next equator crossing will be 102 minutes later, and located 25.5 degrees west.
204 minutes later?
Thus, the next equator crossing 102 minutes after the second pass,will take place at 25.5 degrees further west , which would place this crossing at 51 degrees west longitude (25.5 + 25.5). This would be 51 degrees further west than the first pass.
10. How many orbits will the satellite complete in one day?
Each orbit for this satellite takes 102 minutes, there are 1,440 minutes in a 24 hour period, so 1,440 ÷ 102 = 14.11 orbits in a day.
11.How many miles does the satellite travel during one orbit?
Earth's circumference is 24,478 miles, but the satellite is has an altitude of 534 miles, and the diameter of Earth is 7,926 mi so one orbit is now Csatellite= (7,926 mi + 534 mi) x π = 26,564 mi, not counting for the bulge at Earth's equator and taper at the poles.
or
Csatellite= (12,756 km + 860 km) x π = 42,754 km, not counting for the bulge at Earth's equator and taper at the poles.
12. How many miles does the satellite travel during each day?
Our calculations show that the satellite will make 14.11 orbits/day x 26,564 mi/ orbit = 375,818 miles/day !!
or
Our calculations show that the satellite will make 14.11 orbits/day x 42,754 km/ orbit = 603,259 km/day !!
13. How many times will your location be viewed by this satellite in one day?
At least four times/day. The satellite will usually come within range on two consecutive orbits, sometimes three. Usually figure on a pass to the east of your location, nearly overhead, and then to the west. Remember that at one part of the day the satellite will be on an ascending pass (crossing the equator going north) and at another time of the day the satellite will be on a descending pass (crossing the equator going south).
Here is one final activity which will test your understanding of orbital parameters. Assume you are tracking a NOAA-class satellite with an orbital period of 102 minutes, and a longitudinal increment of 25.5 degrees west/orbit.
Complete the chart for the remaining five orbits.
Orbit # Equator Crossing (EQX) Time
1 0 degrees 1200 UTC
2
3
4
5
6
Here's what you should have:
2 25.5 degrees 1342 UTC
3 51.0 degrees 1524 UTC
4 76.5 degrees 1706 UTC
5 102 degrees 1848 UTC
6 127.5 degrees 2030 UTC
Folder: 1Progress: 0 / 0 -
In an effort to keep this particular lesson updated and user-friendly, it would be greatly helpful to the Enterprise In Space Education Team if you would spend a moment or two answering a few questions about your use of this lesson.
Many Thanks!
The EIS Education Team
Forum: 1Progress: 0 / 0