Quarter Wave Antenna Activity
Topic outline
-
-
Forum
-
-
Quarter Wave Antenna Activity, MS, HS
This activity is designed for teachers to complete with students in order to give students hands-on experience with antenna and radio signals. In this activity, students will solder a quarter wave antenna and use it to detect and explore various radio signals.
Before you start this lesson, make sure students have completed the Radio Waves MS Lesson (Coming soon!) to learn about waves, the EM spectrum, and radio waves!
Also, feel free to check out our other radio lesson, Helical Antenna Satellite Tracking Lesson (Coming soon!)
Note that building your own quarter wave antenna will require soldering, which can be dangerous if students and teachers do not exercise necessary safety precautions. It is urged that teachers have prior experience with soldering before completing this activity with students.
This link is a great resource to use for understanding more about radio signals, antennas, and the softwares you'll be using.
-
Hardware:- Computers: Students may share with one another, either Mac or Windows will work.
- USB Dongle: Either of the following hardware packages will work, and each antenna built will require a usb dongle. Note that the software that comes in this package will not be used in this activity
* NooElec
* RTL-SDR
* DVB-T+DAB+FM - Soldering Equipment
- Cardboard, Sandpaper, and paper towels
- Parts for the Antenna
* 18 gauge wire
* Coaxial cable
* bracket to connect cable and antenna legs
For the Coaxial Cable, one end should be an F-type female connector, and the other end either an MCX male connector or an SMA male connector, depending on your USB Dongle.
To make your own piece, a metal bracket can be purchased at a local hardware store and cut into the desired shape, either by someone who has power tools and knows how to use them, a local shop teacher, or a hardware store. The piece should be roughly a 2.5x2.5 cm square with a hole in the center 1cm diameter to hold the larger end of the coaxial cable.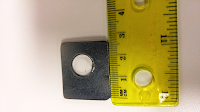
Software:
For windows computers, download SDR Sharp.
If using Mac, the program Gqrx will function similarly. -
Before building your own antenna, get to know the software with the antenna which comes in your USB dongle package.
For incredibly helpful information including installation help, usage, and troubleshooting for SDR Sharp, visit this link.
Procedure:- Once installing SDR Sharp, or Gqrx if using mac, plug the antenna into your USB dongle, and plug your USB into your computer. Then launch the program.
- If using Gqrx, you'll want to visit "receiver options" on the lefthand side of your screen and change the mode in order to hear sound better, try using the setting WFM (stereo).
- At this point, your screen should look somewhat like the following image:
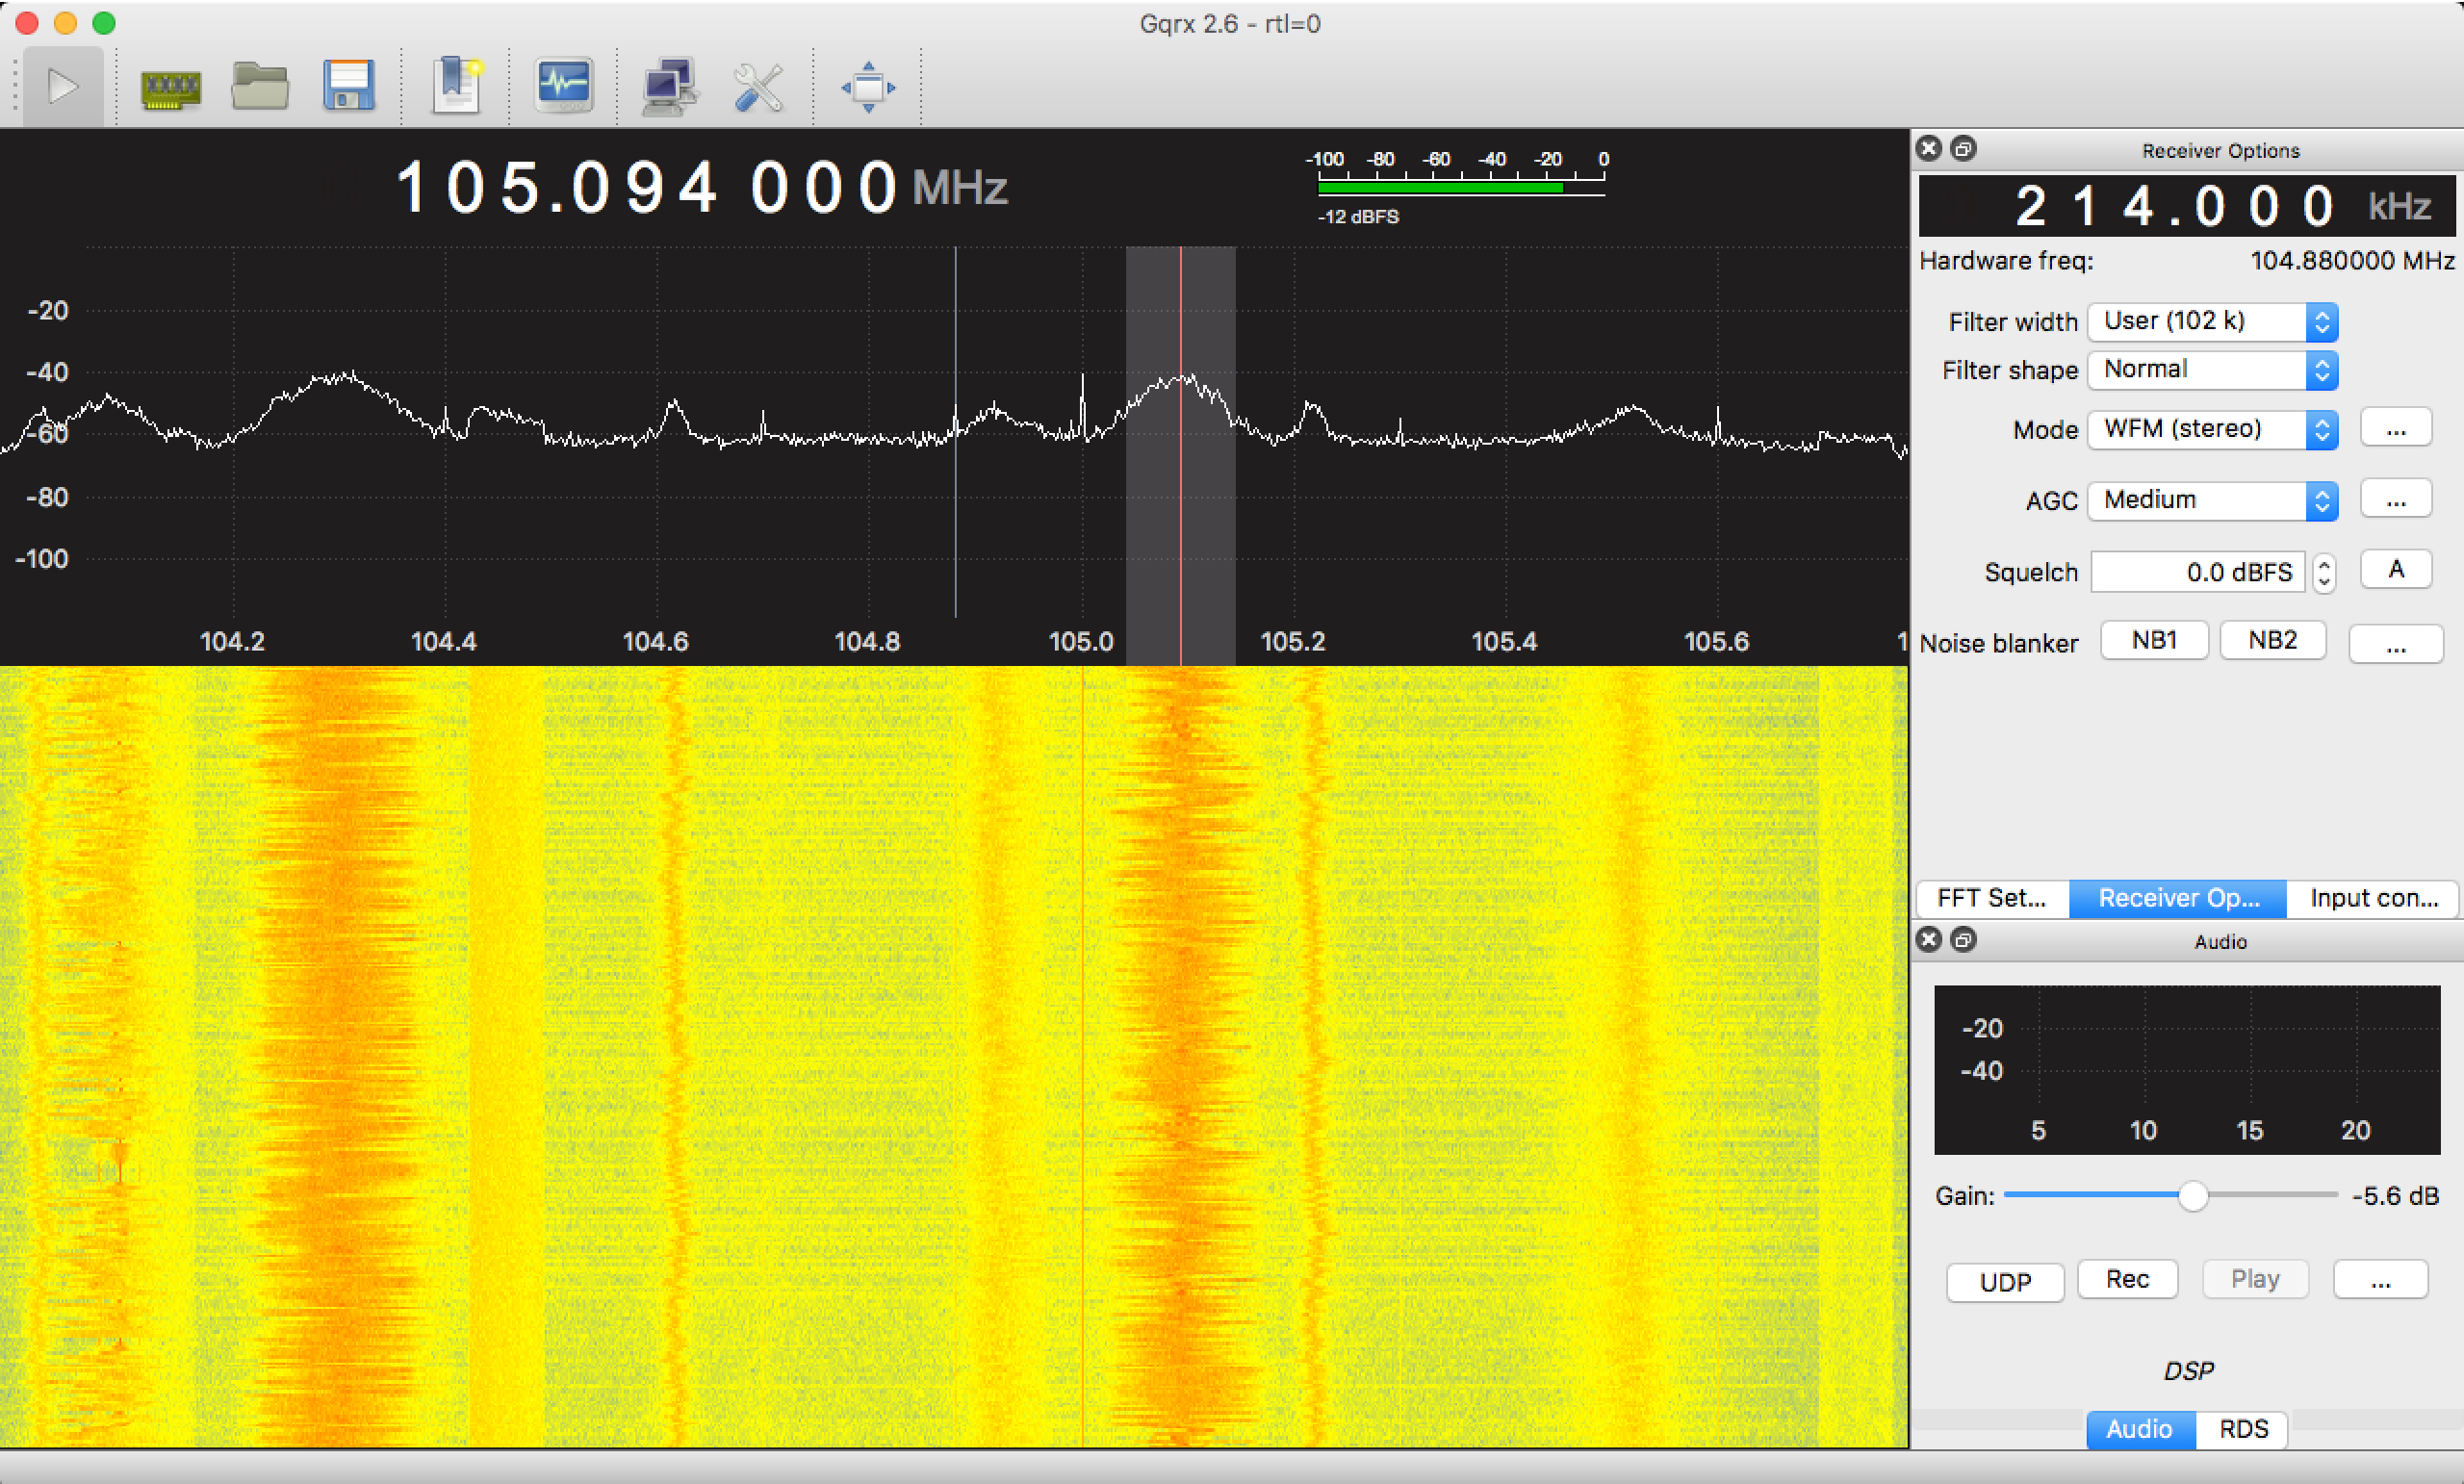
- To get started, click the play button located in the upper lefthand side of your screen.
- The number at the top of your screen, in the example image: 105.094 MHz, is the frequency you are currently receiving. In Gqrx, to change this number, simply click the digit you wish to change, on its top half to increase and bottom half to decrease.
- Start out changing the frequency in small increments. To do this, you can drag the red vertical line with your cursor left and right along the spectrum.
- If something is being broadcasted on a specific frequency, it will show up as a bump on the white line. In the example image, there are broadcasts between 104.2 and 104.4 MHz, and where the red line is between 105.0 and 105.2 MHz.
- To hear these broadcasts more clearly, experiment with dragging the edges of the gray rectangle closer and further away from the red line, encompassing either more or less of the broadcasted signal.
- To start out, you can begin on frequencies you are familiar with such as searching for popular radio stations, typically broadcasting around 100 MHz.
- From here, students are encouraged to explore a wider range of frequencies. There is a lot to discover! Beyond musical radio stations, there are many different types of broadcasts that students can find.
- Once installing SDR Sharp, or Gqrx if using mac, plug the antenna into your USB dongle, and plug your USB into your computer. Then launch the program.
-
Procedure:
- Using sandpaper, sand down the face of the rectangular brackets in order to remove any coatings. Then clean with a damp paper towel and dry.
- To protect the table, place thick cardboard (not corrugated) down where students will be soldering, and use a stand for the soldering iron for safety. Heat up the soldering irons.
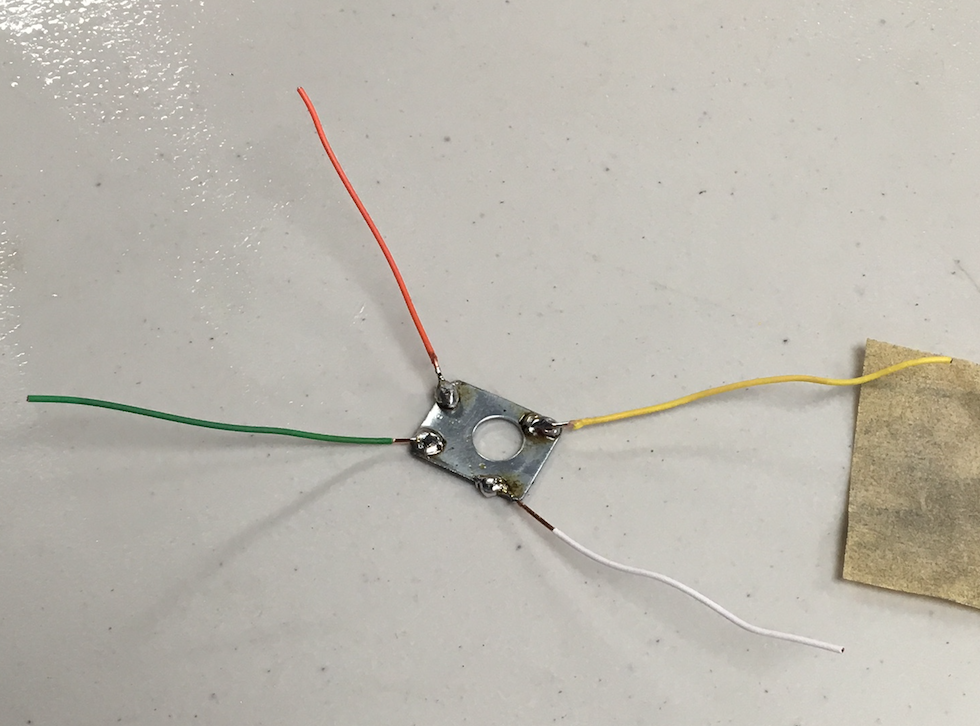
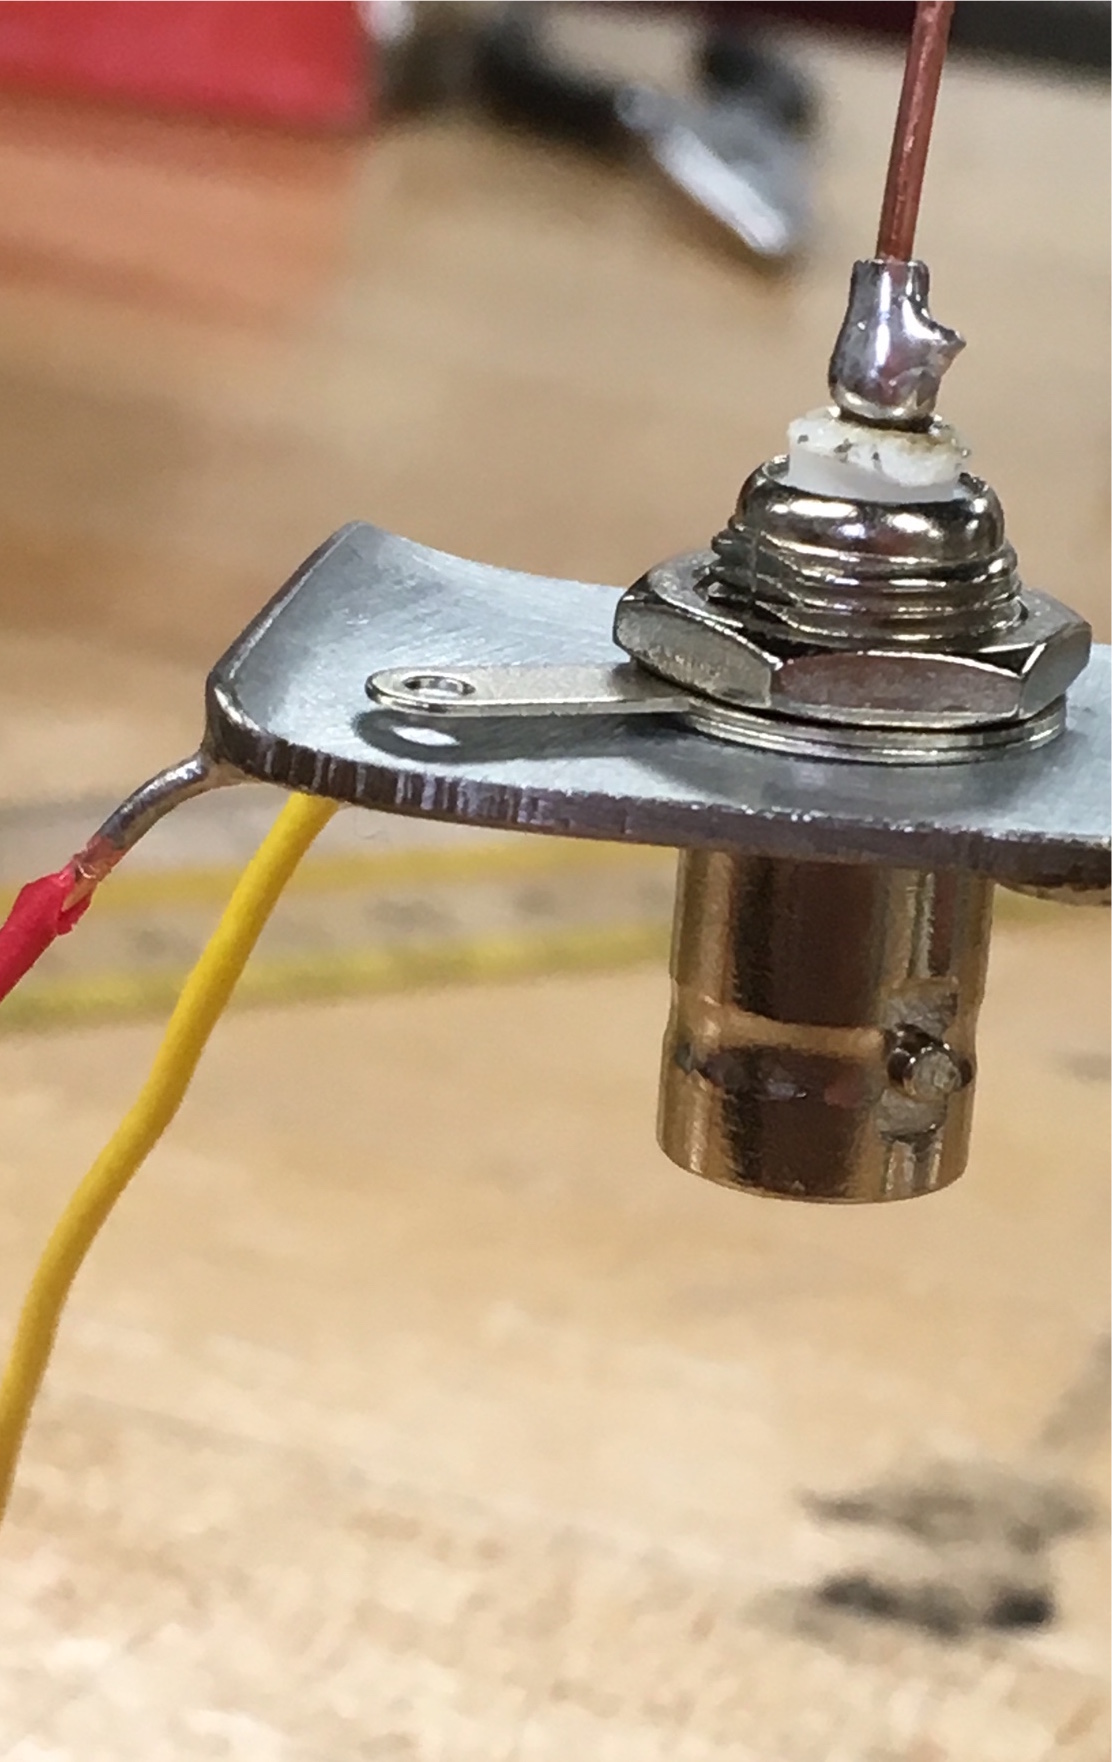
- Solder four pieces of wire (3.5 inches in length each) onto one side of the four corners of the bracket as shown in the photo below. Apply a small amount of flux chemical to the surface of the bracket before soldering. Students can pair up during this activity, one holding the soldering iron while the other holds the solder. The pieces being soldered together can be held by a soldering aid or similar device can be constructed from a stiff wire, duct tape, and clothespins. An example of this is also pictured below.

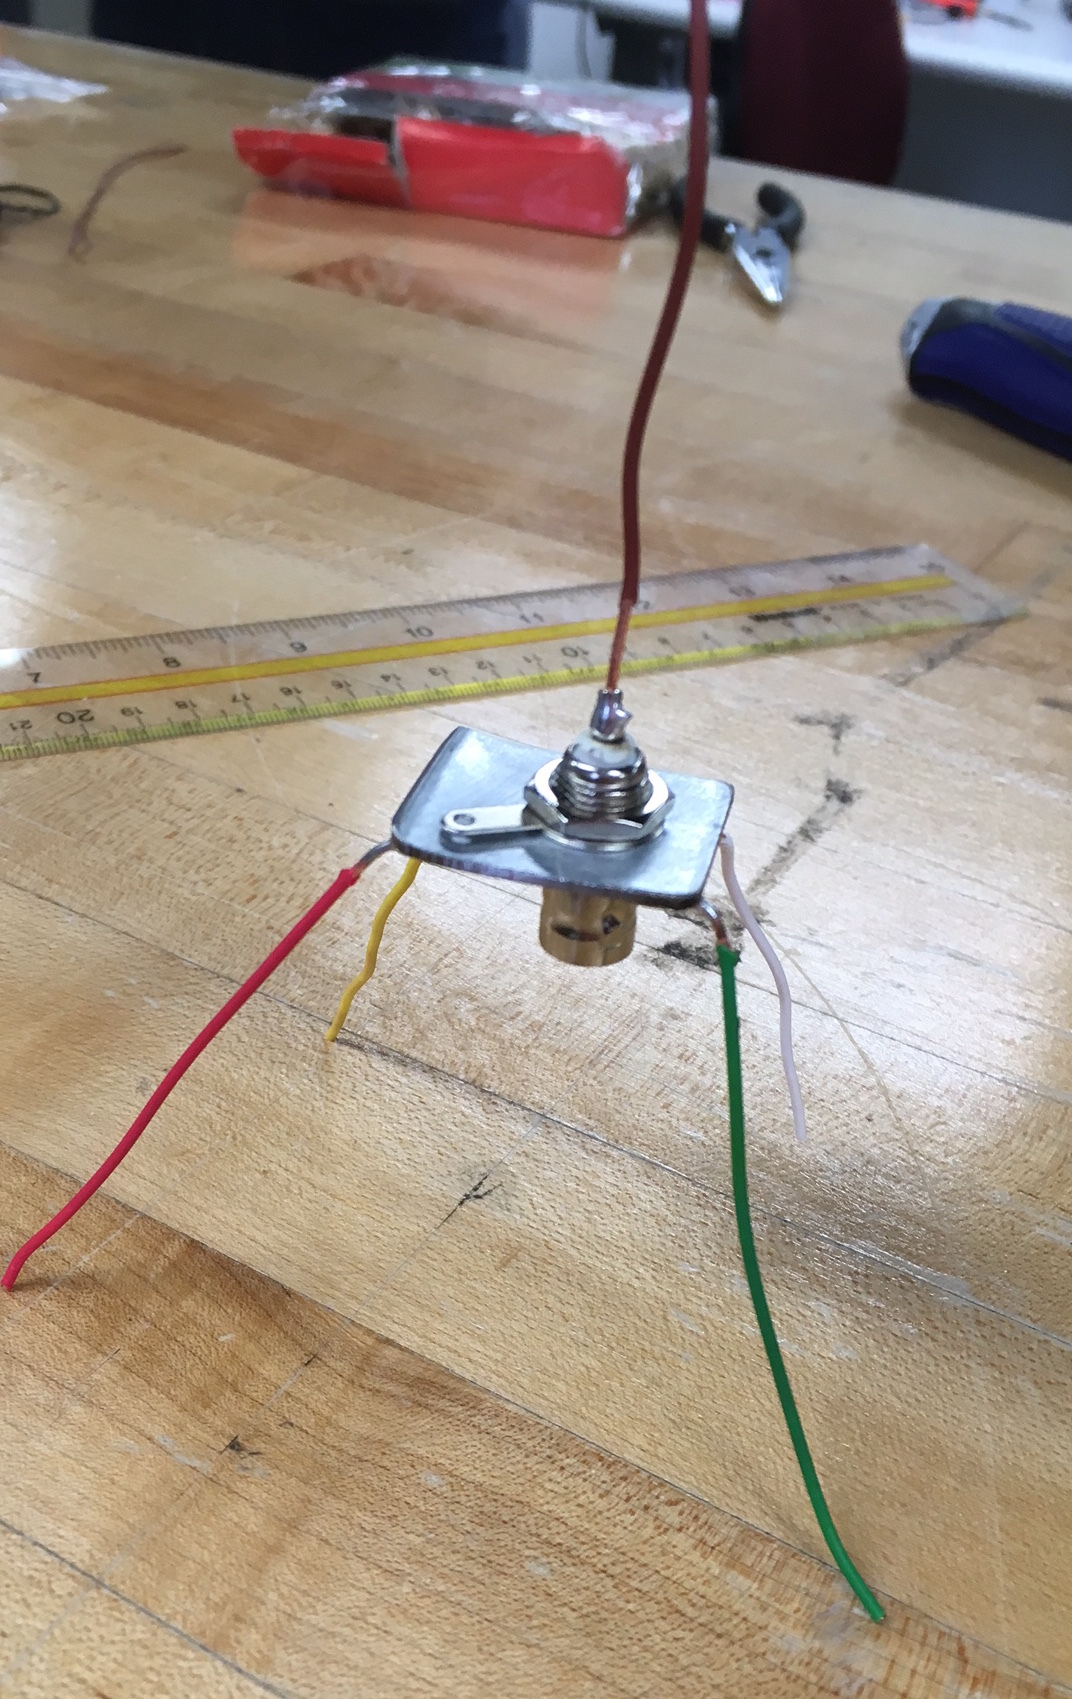
- Insert the coaxial cable into the bracket, with the cable on the same side as the antenna legs. Screw in tightly.
- Some models of the cable require you to solder a wire (6.5 inches in length) onto the top of the cable piece; with others, you simply insert one end of the wire into the piece. The following pictures are of this construction with the top wire soldered on. The pictured model does not have the rest of the cable which would normally be on the underside of the center piece.
-
Now that you have built your own Quarter Wave Antennas, go ahead and plug them into your USB Dongle, and plug the USB Dongle into your laptop.
Next, open up either SDR Sharp or Gqrx, and continue exploring different frequencies and broadcasts.
Some frequencies to try:
- Airline Traffic: 120-140 MHz
- Public and Private Communications: 142-165 MHz, and 420-470 MHz
- Remote car and garage door openers: 310, 315 or 390MHz
In addition, try having students experiment with different receiving options: AM / WFM / NFM.
This antenna is designed for frequencies close to 1 GHz, but can be adjusted by using a longer wire on the top for lower frequencies, or a shorter wire for higher frequencies.
-
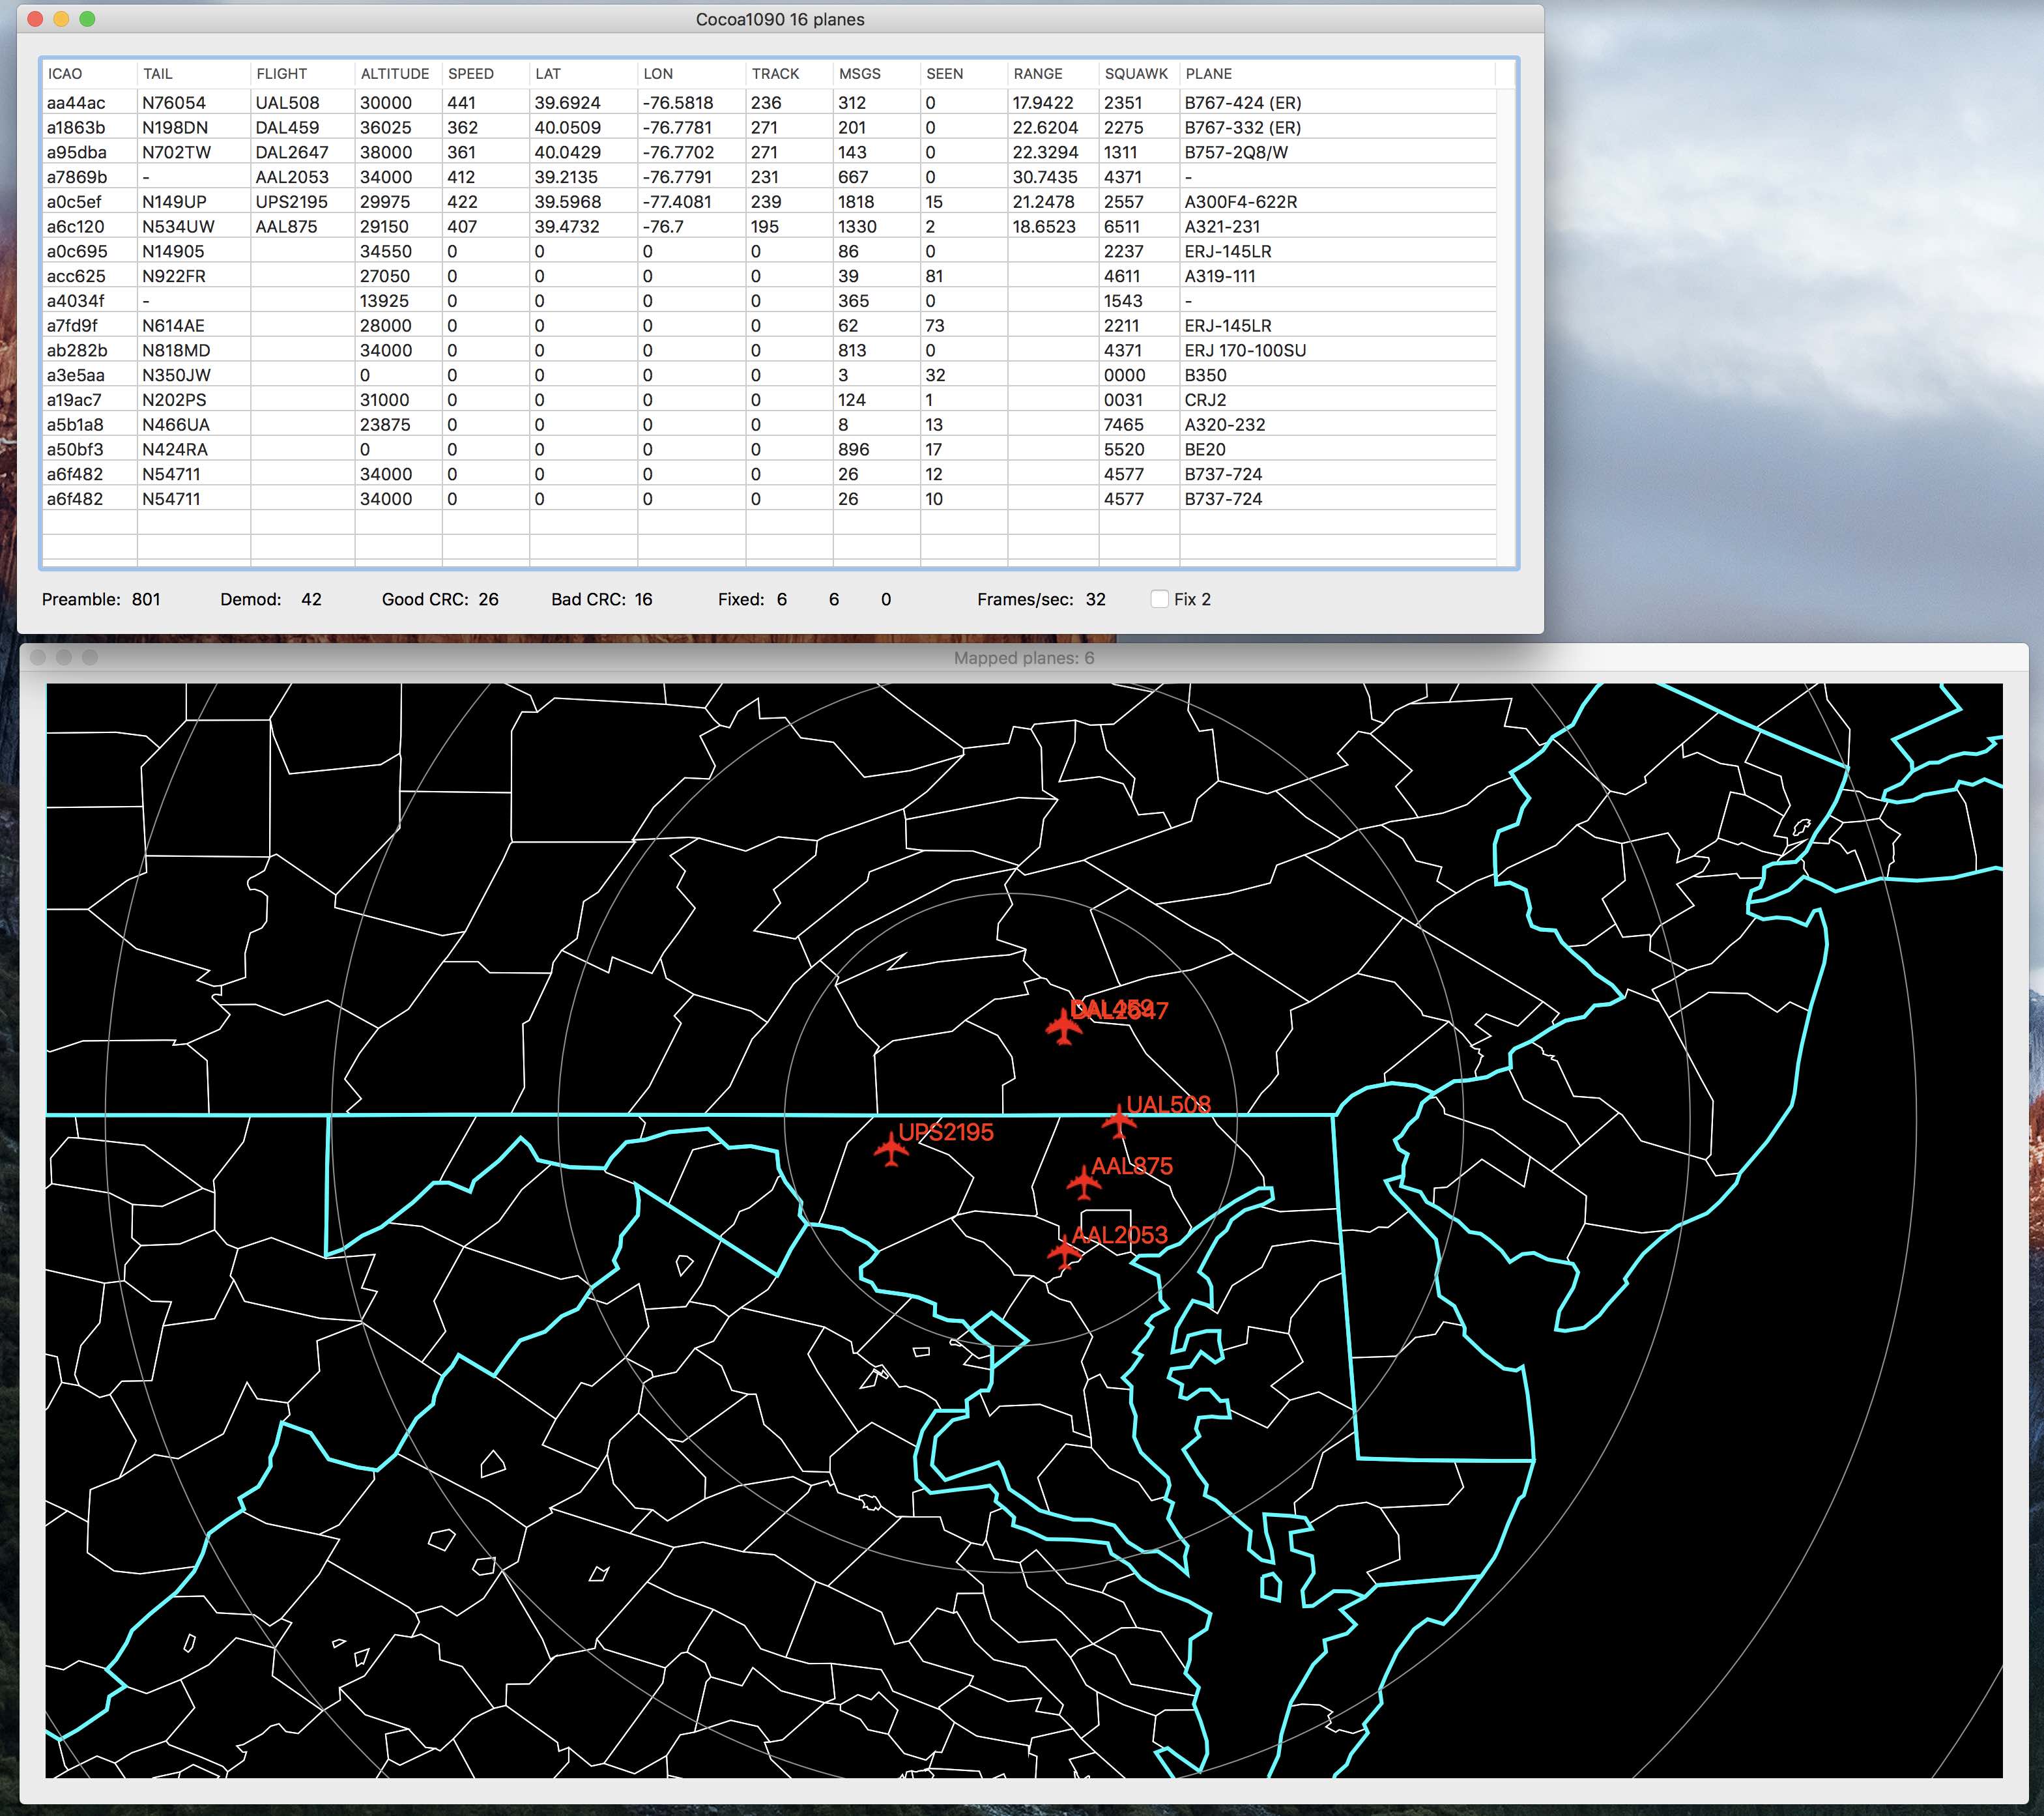
These antennas can be used in combination with an additional software to easily detect aircraft!
For Windows: RTL 1090
For Mac: Cocoa1090
Students can get the flight numbers of aircraft they detect using the antenna and software, then plug them into the website FlightAware to get more information about the flight.
Below is a screenshot image of the Cocoa1090 program being used to detect aircraft.
(Image credit: Black Cat Systems)
-
In Journal #1, record some of the frequencies you explored and what you heard on those frequencies. Also include any observations you made, including if some settings worked better than others, or any patterns you observed.
-
Journal
-